
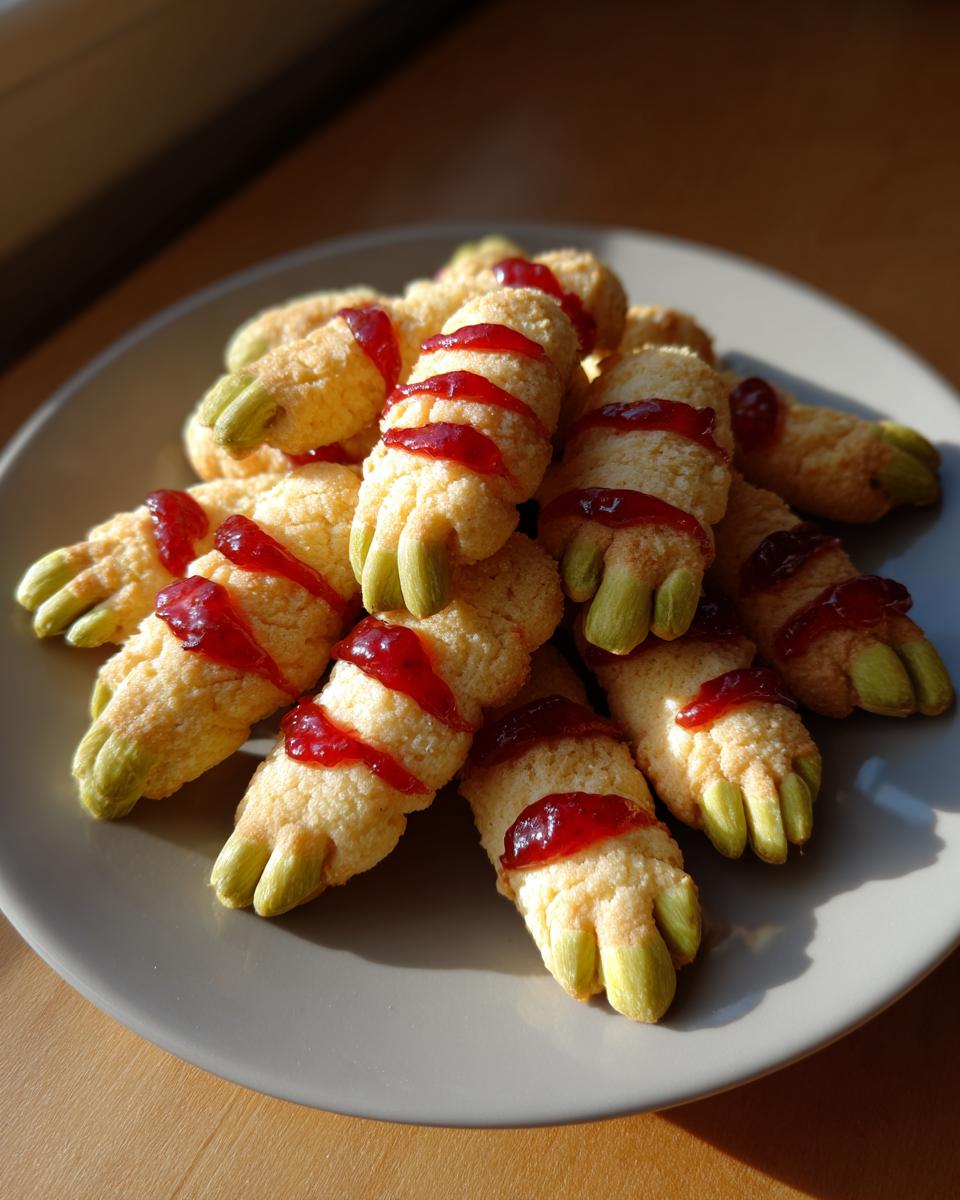
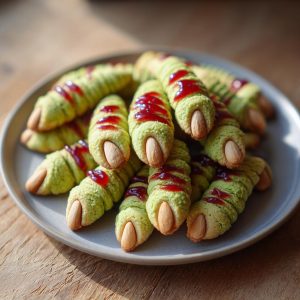
Oh boy, Halloween means one thing in my kitchen: spooky treats! And nothing screams spooky quite like a tray full of creepy, realistic witch finger cookies. Seriously, these aren’t your average sugar cookies; we’re talking about almond fingernails, knuckle lines, and that perfectly eerie green hue. I remember the first time I made these for a neighborhood party – the kids absolutely lost it (in the best way possible!). They’re surprisingly simple to whip up, and they always get the most compliments. Trust me, once you try shaping these little guys, they’ll become your go-to Halloween bake. You can even follow our Facebook page here for more holiday baking fun!
- Why You'll Love These Witch Finger Cookies
- Crafting Realistic Witch Finger Cookies: Ingredients You'll Need
- Step-by-Step: How to Shape Witch Finger Cookies
- Baking Your Spooky Witch Finger Cookies
- The Bloody Touch: Almond Nails and Jam Details
- Make Ahead and Store Witch Fingers for Halloween
- Tips for Success with Witch Finger Cookies
- Frequently Asked Questions about Witch Finger Cookies
- Estimated Nutritional Information
- Share Your Spooky Creations!</h2 I absolutely LOVE seeing your baking adventures! If you give these creepy witch finger cookies a try, please share your masterpiece! Drop a comment below, leave a rating, or tag me on social media. Seeing your unique takes on these spooky treats makes my day. You can also reach out to me directly through my contact page if you have any questions or just want to share how your baking went!
Why You’ll Love These Witch Finger Cookies
Seriously, these witch finger cookies are a Halloween dream! They look SO creepy-cool, everyone always raves about them. Plus, they’re genuinely easy to make, even with all the shaping. You get that yummy, buttery shortbread flavor that just melts in your mouth, and the almond nail? Genius! They’re perfect for classroom parties, neighborhood trick-or-treats, or just a fun afternoon bake with the kids. You’ll absolutely adore how they add that perfect spooky touch to any Halloween spread.
Crafting Realistic Witch Finger Cookies: Ingredients You’ll Need
So, to get these spooky little guys just right, you don’t need anything too fancy. It all starts with good old-fashioned ingredients that you probably already have in your pantry. Think of it like this: quality ingredients mean a quality cookie, and you want these to be legendary! We’re talking about 2 1/4 cups of all-purpose flour, which gives us that perfect cookie structure. Then, a whole cup of softened, unsalted butter – please, use the real stuff; it makes all the difference! For sweetness, we’ve got 3/4 cup of granulated sugar. One large egg and a teaspoon of vanilla extract are essential for binding and flavor, and just a quarter teaspoon of salt balances everything out. Now, for the fun part: you’ll want some slivered almonds for those creepy fingernails and a bit of red jam or gel icing for that extra gory touch. And if you’re going for that classic green witch look, grab some green food coloring, or we can talk about natural options later!
Step-by-Step: How to Shape Witch Finger Cookies
Alright, this is where the magic really happens – turning plain dough into creepy, crawly witch fingers! First things first, make sure your dough is nice and chilled. If it’s too warm, it’ll be sticky and hard to work with. Grab about a tablespoon of dough, roll it into a little log, and then gently shape it into a tapered finger shape. Don’t worry if it’s not perfect; real fingers aren’t either! The key is to make one end a bit thicker (that’s your knuckle) and taper the other end to a point. You’ll feel the dough change consistency as you work, and that’s a good sign it’s ready to be shaped without getting mushy. It’s almost like sculpting, and it’s super satisfying!
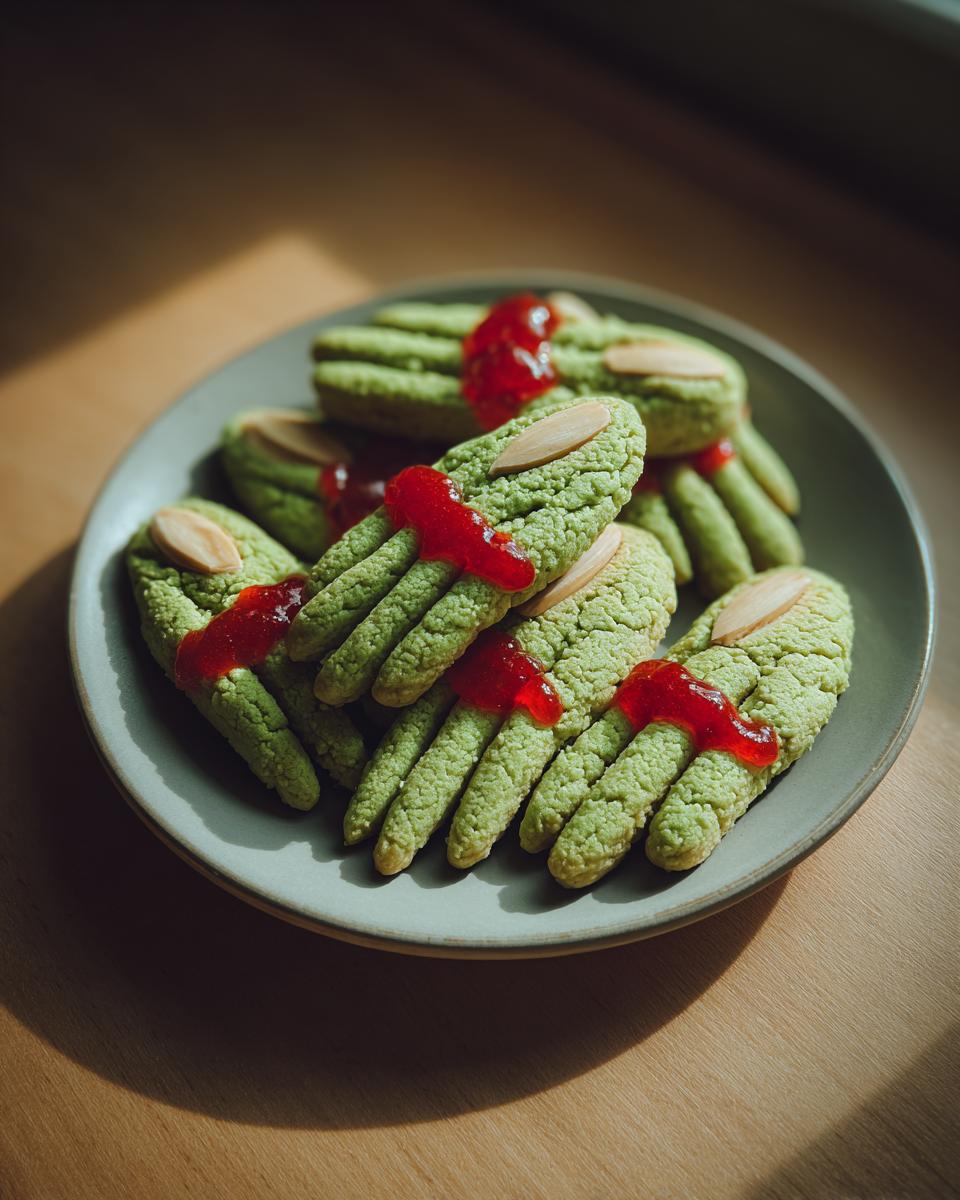
Achieving the Perfect Green Hue for Witch Fingers
Now, for that classic green witch look! If you’re using food coloring, just add a few drops to your softened butter before you start creaming it with the sugar. Mix it in really well until you get a nice, even green. Start with just a little bit and add more until you’re happy with the color – you can always add more, but you can’t take it away! If you’re going the natural route, and I totally love this, whisk in about a teaspoon of matcha powder or a tablespoon of spinach puree with your dry ingredients. The matcha gives a lovely earthy green, while spinach is super subtle. Just mix it thoroughly until you don’t see any streaks, and you’ll have perfectly eerie green dough!
Creating Realistic Knuckle Lines and Finger Details
This is my favorite part – adding the texture that makes these look SO real! Once your finger shape is ready, take a small knife or even a toothpick and gently press lines into the dough where the knuckles would be. Two or three lines usually do the trick! Then, at the tip, make a little dimple or two to look like the bent joint. And don’t forget the fingernail! Gently press a slivered almond right onto the tip. I like to push it in just a little bit so it really sticks. For an extra spooky touch, you can even give the whole finger a little natural-looking bend before you put it on the baking sheet. It really makes them look like they’re reaching out!
Baking Your Spooky Witch Finger Cookies
Okay, so now that we’ve got our creepy little fingers all shaped up with their pointy nails, it’s time to get them into the oven! Preheat your oven to a nice, gentle 325°F (160°C). Trust me, a lower temp is key here – it helps them bake through without burning too quickly. Lay your cookies out on a baking sheet lined with parchment paper. Give them a little space so they don’t all stick together. Bake them for about 15 to 20 minutes. You’re looking for the edges to be just lightly golden, but the centers should still look a little pale. They’ll firm up as they cool!
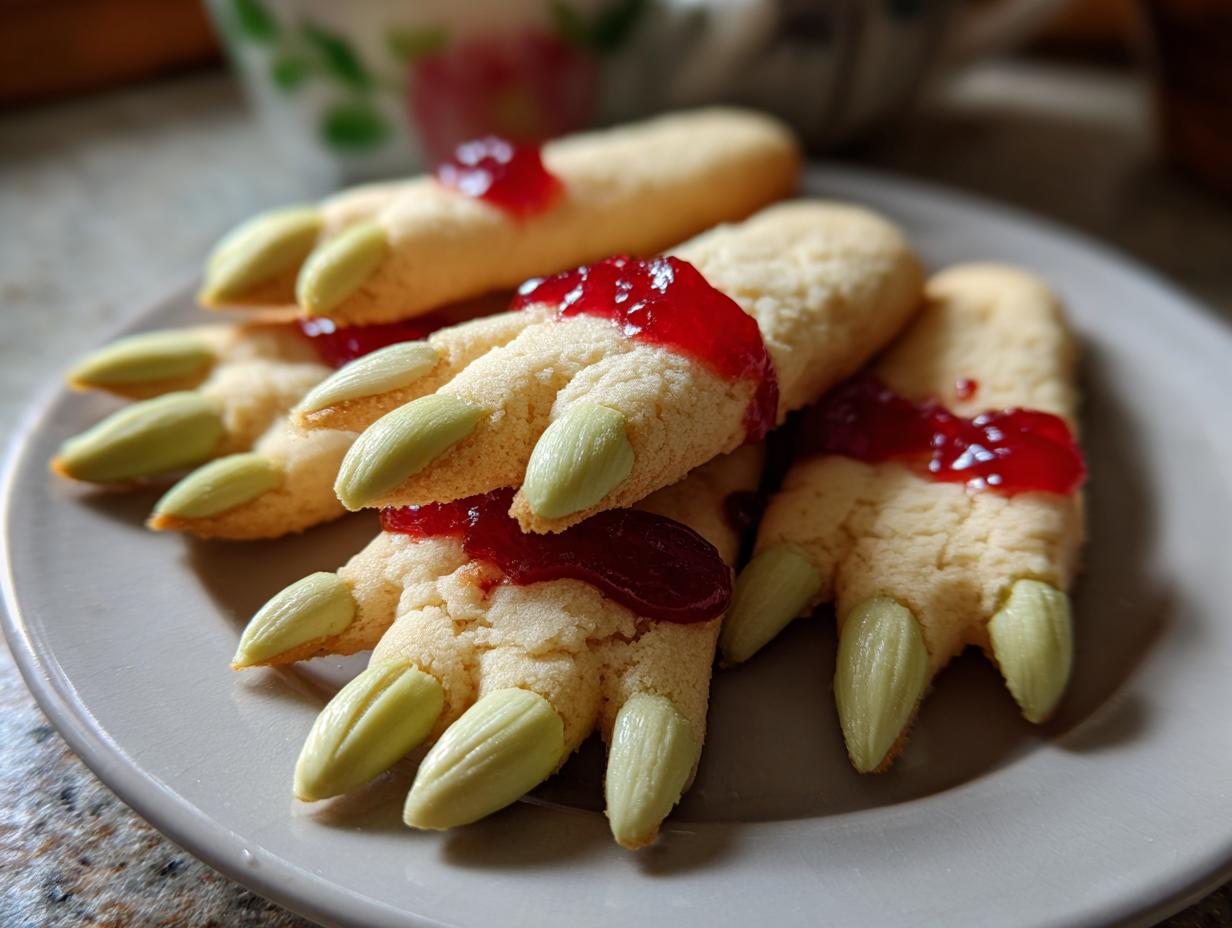
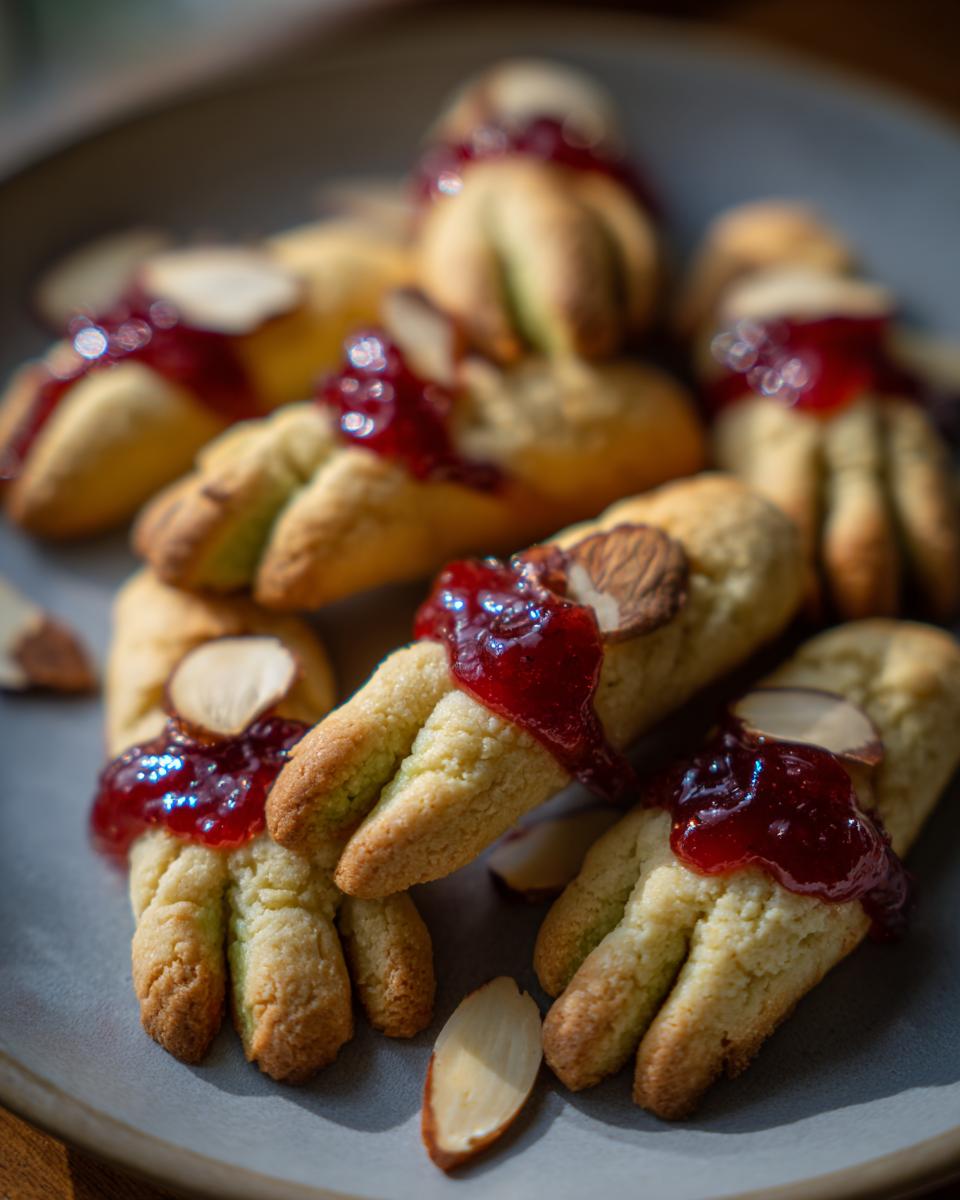
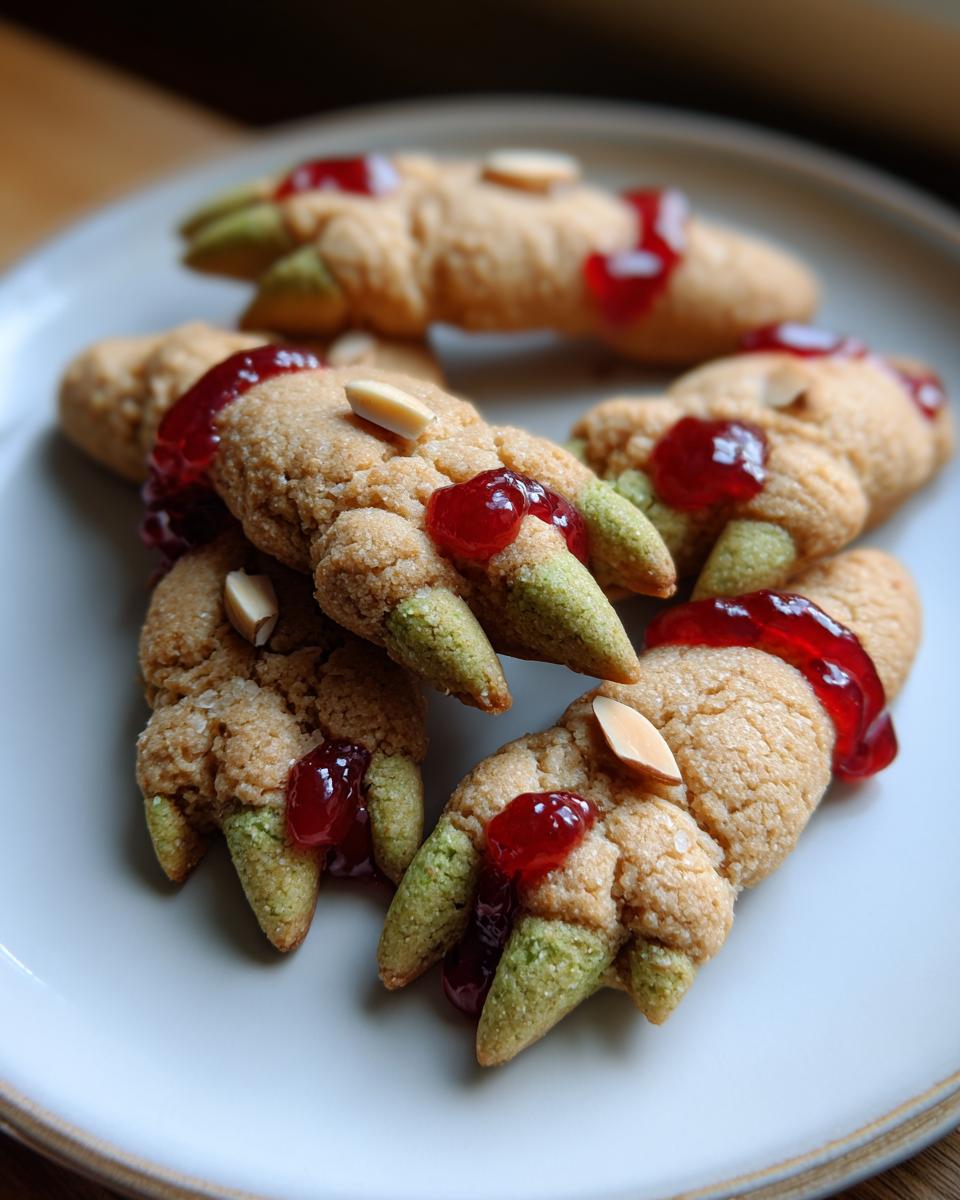
The Bloody Touch: Almond Nails and Jam Details
Now for the super creepy, super fun part: adding the “blood”! Once your witch fingers have cooled completely, grab your slivered almonds and that red jam or gel icing. I love using a good quality red jam, like raspberry or even my homemade peach jam with a bit of red food coloring mixed in, because it has a lovely thick consistency. Just dab a little bit right onto the tip of each almond fingernail. You want it to look like fresh blood pooling there. If you’re feeling extra spooky, you can even add a tiny smear or drip down the finger itself. It’s amazing how a little dabble of red jelly can make these cookies go from creepy to downright chilling!
Make Ahead and Store Witch Fingers for Halloween
Okay, so you’ve spent all this time making these awesome witch finger cookies, and you want to make sure they stay fresh until your party. Good news! You can totally make the dough ahead of time. Just whip up the dough, wrap it up tight in plastic wrap, and pop it in the fridge for up to 3 days. When you’re ready to bake, just let it soften for a few minutes. Once they’re baked and cooled completely, store the cookies in an airtight container at room temperature. They’ll stay wonderfully fresh for about 5 days. That means you can get all the spooky shaping done in advance and just worry about the jam “blood” right before serving!
Tips for Success with Witch Finger Cookies
Okay, so you’ve got the recipe, and you’re ready to make some seriously creepy witch finger cookies! Here are a few little tricks I’ve picked up over the years that really make these suckers shine. First off, dough consistency is everything. If it feels too soft to shape, don’t be afraid to pop it in the fridge for 10-15 minutes. It makes shaping so much easier! When you’re creating those knuckle lines, a gentle touch is best. You don’t want to cut all the way through. And that almond nail? Press it in firmly but gently, or it might pop off during baking. I’ve learned that overbaking is the enemy here – you want those edges just kissed with gold, not dark brown. Check out my blog for more baking wisdom, and for a totally different vibe, you might love my snickerdoodles too!
Frequently Asked Questions about Witch Finger Cookies
Got questions about these creepy crawlies? I’ve got answers! People always ask me the best way to get that perfect texture, or what to do if their dough gets a little too soft. And let’s be real, who doesn’t want to know how to make these look *extra* spooky? We’ll cover all the bases, from getting that perfect green hue without gross artificial stuff, to making sure your cookie fingers are perfectly shaped before they hit the oven. I’ll even share some tricks for making them look like they’ve seen a few haunted houses. You can find even more fun desserts here if you’re looking for more treats!
Can I make witch finger cookies gluten-free?
Oh, absolutely! If you need to go gluten-free, just swap out the all-purpose flour for a good quality 1-to-1 gluten-free baking blend. Make sure it has xanthan gum in it! You might need to add a tiny bit more liquid, like a teaspoon of milk or water, if the dough seems crumbly. They’ll still be just as delicious and spooky!
What’s the best jam for the bloody effect?
For that perfect gory look, you really want something with a nice, deep red color and a thick consistency. Raspberry jam is usually my go-to because it’s got that beautiful color and it’s not too watery. Strawberry jam works too if it’s nice and thick. You can also find special gel icing at craft stores or the baking aisle that’s made for decorating and has a fantastic “bloody” look. Just a little dab goes a long way!
How do I get my witch fingers to look more realistic?
To really nail that realistic look, play around with the dough! Before you bake, give your finger cookie a gentle curve – imagine it’s reaching out. Also, don’t be afraid to really press those knuckle lines in with your knife; you can even add a few little horizontal grooves to mimic skin texture. For the almond nail, try to press it in at a slight angle, almost like a real nail. A hint of brown food coloring mixed into the dough or a light dusting of cocoa powder after baking can add depth and make them look even more gnarled and ancient!
Estimated Nutritional Information
Just a little heads-up, the nutritional info for these witch finger cookies is an estimate, okay? It can totally vary depending on the exact ingredients you use, especially things like the brand of butter or if you use natural colorings. But generally, you’re looking at about 150 calories per cookie, with around 8 grams of fat and 18 grams of carbs. They’re yummy, a little bit sweet, and perfect for a Halloween treat!
Share Your Spooky Creations!</h2
I absolutely LOVE seeing your baking adventures! If you give these creepy witch finger cookies a try, please share your masterpiece! Drop a comment below, leave a rating, or tag me on social media. Seeing your unique takes on these spooky treats makes my day. You can also reach out to me directly through my contact page if you have any questions or just want to share how your baking went!
PrintWitch Finger Cookies
Create realistic, spooky witch finger cookies for Halloween. This recipe uses a simple shortbread dough, shaped and detailed to look like fingers with almond nails and a bloody jam effect.
- Prep Time: 30 min
- Cook Time: 20 min
- Total Time: 50 min
- Yield: 24 cookies 1x
- Category: Dessert
- Method: Baking
- Cuisine: American
- Diet: Vegetarian
Ingredients
- 2 1/4 cups all-purpose flour
- 1 cup (2 sticks) unsalted butter, softened
- 3/4 cup granulated sugar
- 1 large egg
- 1 teaspoon vanilla extract
- 1/4 teaspoon salt
- Green food coloring (optional, or use matcha powder/spinach puree)
- Slivered almonds
- Red jam or gel icing
Instructions
- Cream together softened butter and granulated sugar until light and fluffy.
- Beat in the egg and vanilla extract until well combined.
- In a separate bowl, whisk together flour, salt, and green food coloring (if using) until evenly distributed.
- Gradually add the dry ingredients to the wet ingredients, mixing until a dough forms. Do not overmix.
- If using natural coloring, incorporate matcha powder or spinach puree until desired green hue is achieved.
- Divide the dough into small portions and shape each into a finger.
- Use a knife to create knuckle lines and indentations.
- Press a sliver of almond onto the tip of each cookie for a fingernail.
- Place cookies on a baking sheet lined with parchment paper.
- Bake at 325°F (160°C) for 15-20 minutes, or until the edges are lightly golden.
- Let cookies cool on the baking sheet for a few minutes before transferring to a wire rack to cool completely.
- Once cool, apply red jam or gel icing to the almond nails and optionally add a bit to the cookie to resemble blood.
Notes
- For a more realistic look, slightly bend the dough before baking to create a natural curve.
- Store cookies in an airtight container at room temperature for up to 5 days.
- You can make the dough ahead of time and refrigerate it for up to 3 days.
- Consider using a gluten-free flour blend for a gluten-free version.
Nutrition
- Serving Size: 1 cookie
- Calories: 150
- Sugar: 10g
- Sodium: 30mg
- Fat: 8g
- Saturated Fat: 5g
- Unsaturated Fat: 3g
- Trans Fat: 0g
- Carbohydrates: 18g
- Fiber: 1g
- Protein: 2g
- Cholesterol: 25mg