

Oh, you know those desserts that just wrap you up like a warm hug? The ones that taste like pure comfort and happy memories? That’s exactly what this classic banana pudding is for me. It actually reminds me so much of standing on a stool in my Grandma Eleanor’s kitchen, helping her whip up something magical. She kept her most treasured recipes in this old wooden box, and this banana pudding was always a star. Here at Recipes To Keep, we’re all about those recipes that become family traditions, the ones you know you’ll want to make again and again – real keepers. And trust me, this one is definitely a keeper. It’s the kind of dessert that just makes everything feel a little bit better, and I’m so excited to share it with you! You can follow along with our kitchen adventures on Facebook, or read more about my personal story and mission if you’re curious!
- Why You'll Love This Classic Banana Pudding
- Homemade Vanilla Custard for Pudding: The Creamy Base
- Assembling Your Perfect Banana Pudding
- Magnolia Bakery Banana Pudding vs. From Scratch
- How Long to Chill Banana Pudding for Best Texture
- Tips for Success with Your Banana Pudding
- Banana Pudding Calories and Nutritional Information
- Frequently Asked Questions About Banana Pudding
- Share Your Banana Pudding Creations!
Why You’ll Love This Classic Banana Pudding
This banana pudding is a total winner for so many reasons! It’s shockingly easy to make, even the custard part from scratch – trust me, you can totally do it. That creamy vanilla custard, sweet bananas, and soft wafers just hit all the right comforting notes. Plus, it looks gorgeous in a trifle bowl and is always a huge hit at any gathering, screams classic Southern charm. It’s just pure joy in a dish!

Homemade Vanilla Custard for Pudding: The Creamy Base
Okay, so the heart and soul of any truly amazing banana pudding, if you ask me, is that glorious, luscious vanilla custard. Forget those packets of instant stuff; making it from scratch is *so* worth the little bit of extra effort. It adds this incredible richness and depth of flavor that you just can’t fake. Plus, getting that perfect, thick-but-still-pourable texture is super satisfying! We’re talking about a custard that’s smooth as silk, not watery or lumpy – and I’ll show you exactly how my grandma did it, and how I perfect it every time. It really makes this dessert a true classic and a total showstopper.

The magic really happens when you cook it up just right. You want it thick enough to coat the back of a spoon, and the tempering of the eggs is key to avoiding any scrambled bits in your beautiful custard. It’s a simple process, but paying attention to those details makes all the difference in the final texture and creaminess. You can find more of my favorite dessert recipes here!
Ingredients for Homemade Vanilla Custard
- 1/2 cup granulated sugar
- 1/4 cup cornstarch
- 1/4 teaspoon salt
- 3 cups whole milk
- 4 large egg yolks
Crafting the Perfect Vanilla Custard
Alright, let’s get this custard going! First, in a medium saucepan, whisk together the sugar, cornstarch, and salt until they’re all nicely combined. Then, slowly whisk in that whole milk until everything is super smooth. Now for the eggs – in a separate bowl, whisk those yolks until they’re nice and light. The trick is to temper them: drizzle in about a cup of that warm milk mixture into the egg yolks while whisking like crazy. This gently warms the yolks so they don’t scramble when you add them back to the pot. Pour that tempered mixture back into the saucepan with the rest of the milk. Keep stirring constantly over medium heat – you’ll see it start to thicken and bubble. Let it bubble for about a minute more, then take it off the heat. Stir in the butter and vanilla extract until the butter melts right in. Easy peasy!
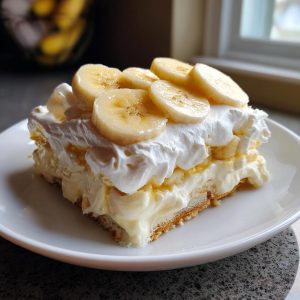
Assembling Your Perfect Banana Pudding
Alright, putting this whole glorious thing together is where the real magic happens! It’s all about creating those beautiful layers that make banana pudding so special. You want a nice balance of creamy pudding, sweet bananas, and those perfectly softened vanilla wafers. Start with a layer of that gorgeous, homemade custard – I like to use about a quarter of it. Then, scatter a generous layer of vanilla wafers over the top, followed by a layer of your sliced bananas. Repeat those layers – pudding, wafers, bananas – until you’ve used everything up, ending with a final layer of pudding on top. It looks so pretty even before chilling!

Don’t worry about the wafers getting too soggy right away; the chilling time is key to getting them just perfectly tender, not mushy. It’s a delicate balance, for sure, but so, so worth it. Trust me! You can check out some of my other easy dessert ideas here, and for super fun breakfast treats, maybe try these mini pancake cereal!
Vanilla Wafer Layering Tips
The secret to those perfect, soft-but-not-mushy wafers is all in the layering and the chilling time. Pack them in there pretty snugly when you add your layers – don’t leave huge gaps! This gives them enough of that luscious pudding to soak into, making them tender and luscious. You want them to yield when you gently press them, not feel like they’re dissolving into goo. It’s all about finding that sweet spot before you serve.
How to Prevent Bananas from Browning
Ugh, brown bananas are the bane of a beautiful banana pudding! My go-to trick, just like my grandma taught me, is to give the banana slices a little toss with some lemon juice right before you layer them. It doesn’t change the taste, but it seriously keeps them looking bright and beautiful in your pudding. So, make sure you have a little lemon handy – it’s a lifesaver for presentation and makes sure your banana pudding stays pretty!
Magnolia Bakery Banana Pudding vs. From Scratch
Okay, so I know there’s a super popular way to make banana pudding using instant pudding mix, kind of like the famous Magnolia Bakery banana pudding style. And honestly, it’s definitely quicker! If you’re really pressed for time, using that instant stuff mixed with condensed milk and whipped topping can get you a dessert that *looks* the part. But, and this is a big but, it just doesn’t have that deep, creamy, eggy custard flavor that makes a homemade version just sing. For me, the from-scratch custard is the way to go because that rich, vanilla flavor is what really makes this dessert special. It’s that comforting, classic taste that just can’t be beat, even if it takes a few extra minutes!
How Long to Chill Banana Pudding for Best Texture
Now, this next step is super important, and it’s where some of the magic really happens: chilling! You gotta let this beautiful creation hang out in the fridge for a bit. I’ve found that at least four hours is good, but honestly, overnight is even better. That chilling time does two crucial things. First, it lets all those lovely flavors meld together, making it taste even more amazing. Second, and this is key for that perfect texture, it gives the vanilla wafers just enough time to soften up. You want them tender and luscious, not crunchy, and not totally disintegrated! Waiting is tough, I know, but it makes all the difference for that perfect pudding texture.

Tips for Success with Your Banana Pudding
Okay, let’s talk about making sure your banana pudding is an absolute showstopper every single time! I’ve learned a few tricks over the years, mostly from watching Grandma Eleanor and a few of my own kitchen oopsies, that just make everything go smoother. For instance, if your custard seems a little thin, don’t freak out! Sometimes the cornstarch needs a minute longer to really do its thing and thicken up. Just keep it on the heat, stirring, and it should come around. And for those layers, just try your best to be consistent – it makes for such a pretty presentation! You can find my other go-to recipes for brunch here, or check out these yummy BBQ pulled pork sliders too!
Make-Ahead and Serving Banana Pudding
This is such a lifesaver if you’re making dessert for a party or potluck! You can totally make this banana pudding a day ahead. I usually assemble all the layers – pudding, wafers, and bananas – but I save the top layer of bananas and maybe a few wafers for right before serving. This keeps the top looking super fresh and prevents those very top bananas from getting too brown. It also keeps the very top wafers from getting *too* soft if you’re worried about that. And if you want to make it a bit fancier, or for individual servings that are just adorable, try layering everything into little mason jars! Everyone gets their own perfect portion, and they look so cute lined up for picnics or parties. Yep, individual mason jar puddings are a total win!
Banana Pudding Calories and Nutritional Information
Now, let’s chat a little bit about the good stuff – the nutritional side of things. This banana pudding is definitely a treat, and like most homemade desserts, it’s made with rich ingredients. While I always say it tastes best when you don’t think too hard about the numbers, it’s nice to have an idea! A typical serving (and keep in mind, our portions might be a little generous because, well, it’s *that* good!) has roughly 450 calories, with about 50 grams of sugar and 20 grams of fat. Remember, these amounts are just estimates, and they can totally change depending on the brands you use and the exact size of your serving. If you’re curious about specific banana pudding calories or other nutritional bits, feel free to reach out!
Frequently Asked Questions About Banana Pudding
Got questions about whipping up this classic treat? I’ve got you covered! It’s totally normal to have a few things pop up as you’re making it, especially with a from-scratch custard. If you have any other questions, feel free to reach out!
Can I use instant pudding for this banana pudding recipe?
You know, you *can* use instant pudding for a quicker version, kind of like the Magnolia Bakery banana pudding style, but it just won’t have that same deep, creamy, homemade custard flavor that makes this classic so special. I really think the scratch custard is worth the little extra effort for the best taste!
How do I store leftover banana pudding?
Oh, if you have any leftovers (which is rare in my house!), just pop it covered into the refrigerator. It’ll stay good for about 2-3 days, but honestly, the wafers can get a bit softer the longer it sits, so it’s best enjoyed within the first day or two!
What are the best bananas to use for banana pudding?
For the perfect balance of sweetness and firmness without being too mushy, I like to use bananas that are ripe but still have a bit of yellow and aren’t overly spotted. They hold their shape nicely when sliced and baked into the pudding!
Share Your Banana Pudding Creations!
Okay, now it’s your turn! I would absolutely LOVE to see your banana pudding creations. Did you try it? Did you add your own little twist? Snap a picture and share it with me, or leave a comment below letting me know how it turned out! Your stories and photos make my whole day, and it’s so much fun to see you all bringing these recipes to life in your own kitchens. You can always check out more baking fun on my blog too! Let’s keep the deliciousness going!
PrintClassic Banana Pudding
A comforting, layered banana pudding with creamy vanilla custard and tender wafers, perfect for any occasion.
- Prep Time: 25 min
- Cook Time: 10 min
- Total Time: 4 hr 35 min
- Yield: 8-10 servings 1x
- Category: Dessert
- Method: No Bake
- Cuisine: American
- Diet: Vegetarian
Ingredients
- 1/2 cup granulated sugar
- 1/4 cup cornstarch
- 1/4 teaspoon salt
- 3 cups whole milk
- 4 large egg yolks
- 2 tablespoons unsalted butter
- 1 teaspoon vanilla extract
- 1 (14 ounce) can sweetened condensed milk
- 1 (8 ounce) package cream cheese, softened
- 1 teaspoon vanilla extract
- 1 (12 ounce) container frozen whipped topping, thawed
- 1 (11 ounce) package vanilla wafers
- 3–4 ripe bananas, sliced
Instructions
- In a medium saucepan, whisk together sugar, cornstarch, and salt. Gradually whisk in milk until smooth.
- In a separate bowl, whisk egg yolks. Gradually temper the egg yolks by whisking about 1 cup of the warm milk mixture into the yolks. Pour the tempered yolk mixture back into the saucepan.
- Cook over medium heat, stirring constantly, until the pudding thickens and bubbles. Cook for 1 minute more. Remove from heat. Stir in butter and vanilla extract until butter is melted and incorporated.
- In a large bowl, beat sweetened condensed milk, softened cream cheese, and vanilla extract until smooth.
- Gently fold in the thawed whipped topping until just combined.
- Spread about 1/4 of the pudding mixture into the bottom of a 9×13 inch baking dish or trifle bowl.
- Layer about one-third of the vanilla wafers over the pudding.
- Arrange one-third of the sliced bananas over the wafers.
- Repeat the layers two more times: pudding, wafers, bananas.
- Cover the dish with plastic wrap, pressing it directly onto the surface of the pudding to prevent a skin from forming.
- Chill for at least 4 hours, or preferably overnight, to allow the wafers to soften and flavors to meld.
Notes
- To prevent bananas from browning, toss them with a little lemon juice before layering.
- For a firmer pudding, you can reduce the amount of whipped topping slightly.
- This pudding can be made a day in advance. Assemble all layers except the top banana layer and wafers, then add those just before serving to prevent sogginess.
- For individual servings, layer the ingredients in mason jars.
Nutrition
- Serving Size: 1 serving
- Calories: 450
- Sugar: 50g
- Sodium: 150mg
- Fat: 20g
- Saturated Fat: 12g
- Unsaturated Fat: 8g
- Trans Fat: 0g
- Carbohydrates: 65g
- Fiber: 2g
- Protein: 5g
- Cholesterol: 50mg